Wednesday, March 12, 2014

6th Grade Altered Book Page

Inspiration for these 6th Grade Altered Book Pages are collected on my Pinterest board HERE.


Students were given one or two pages from some old children's poetry books and were allowed to let their imaginations explore.  We talked about unity and how groups of things can have variety at the same time as being a part of a unit.  We used examples of different classes as well as units in their general curriculum.  Already they are off to a very exciting start!!!  I will post progress shortly!

Friday, March 7, 2014

3rd Grade - Form & Texture Cupcakes


2nd Grade Zendalas - Balance & Pattern


ART from your HEART - Part 2

When I think about memorable moments in teaching thus far, some of my "aha's" come from understanding the fond relationship between writing and art.  Additionally, using a mentor text as a way to communicate not only the concepts needing to cover, but other connections and experiences as well.  The way a mentor text can add validity is far more profound than just sharing a story, making those connections is where students can gain the most understanding.  

So for the project...I have included my lesson plan format as well as the Heart Worksheet.  References that I used, included the February edition of School Arts, pages 40-41.  The magazine applied this lesson beautifully to our classroom and the content needing to be taught.  


Additionally, here are the fruits of the first day.  Students hearts and what they contain.


And here are the students making their first cut in clay.  

Final product to come...


ART from your HEART - Part 1

For the past three months, one Friday and Saturday each month has been devoted to learning more about literacy in our primary classrooms.  Our main focus has been on the "workshop" model from renowned author and educator Lucy Calkins.The following is my final project.

Classroom teachers use "mentor texts" in the classroom when introducing different types of writing genres.  I chose a fantastic book by Sara Fanelli that was shared with us during one of our discussions.  I had originally chosen a different book "The 3 Ninja Pigs," but fell in love with this books message and knew that my 4th graders would love this concept.  Little did they know they were creating an amazingly personal work of art by simply sharing what is important to them.

The book does not share a story of words but as you flip the pages of the book, the reader is taken on a journey of different places the author shares a "map" of.  A couple examples include, a map of my tummy, a map of my day, a color map and of course my favorite and the kids, a map of her heart.

A map of my day.


 A color map.


  A map of my heart.


Student Teacher

I haven't added a post for lack of fun stuff to share, but for lack of hours in the day, for that I apologize.  We have been having such a great time in the art room and part of the reason is because we have had a student teacher!!  I will share some fantastic lessons (one of which is the following) that my student teacher shared, as well as what I learned during our experience.  I want to reflect here, partly because I will know where to go when I need a reminder and partly for those who haven't had a student teacher, what we did, what worked, what was fun, what needed work and what we would do again next time.

The picture posted is of "Andy Warhol and the Roy Lichtenstein Girl" at our annual Night of the Arts event.  More on that later too!

Friday, September 20, 2013

They Are Here!

The sketchbooks have arrived!  We are thrilled to be apart of the sketchbook project this year.  Each 6th grade class will be completing one sketchbook together.  We will update our progress in posts as well as where our sketchbook has traveled.


Three clicks of my heels...take me home to...the art room!

It has been a very educational three weeks for me.  I have learned a lot about orgainzation, time management and well more about my own teaching style and my comfort zone than ever before.  We were in need of a classroom to house a 5th grade classroom while their modular classroom was being built.  Unfortunately, it took longer that everyone thought and school started and we were short a classroom.  So my art room was borrowed by the 5th graders.  That put me mobile.  I traveled to each classroom to teach them art.  Truely, this is how my own elementary art teacher came to teach us art a couple 25 years ago.  I learned how to be uber organized, taking everything that I needed with me. I that my brain had a very difficult time remembering names even though I knew the students, but I was in a different classroom each time.  I learned how empathetic my colleagues and friends are.  I learned how much we need our own space to do our job well.  It is difficult to occupy someone elses space and feel completely comfortable.  It is difficult to turn a general classroom into an art room in 5 minutes.  Through all the difficulties, I have learned a bunch and am thankful for the experience.  Even more thankful, however, to be back in my classroom.  Now we can make messes...and clean them up---while still making and sharing beautiful artwork!

Sunday, August 11, 2013

Bouquets of Sharpened Colored Pencils

To quote one of my favorite movies, You've Got Mail, Tom Hanks mentions bouquets of sharpened pencils and New York in the Fall.  The beginning of a new school year does make me think of bouquets of sharpened, well, colored pencils and brand new glue and beautiful paint brushes that haven't seen a drip of paint anxiously waiting for just a little dip.

My goals for this year have me re-thinking my "big picture."  They include a much bigger focus on the essential questions of our curricula and an emphasis on the experience that it involved with each and every project we do.  The need for thinking strategies and authentic writing has me excited about what we may uncover as artists this year.  Yep, we're going deep!  Head first.

Here is my plan.

Each quarter I plan on doing an assessment that is not only a check for understanding, but an experience that the artist can use to learn more about his/her artwork, themselves as artists, as well as how they can use what they have learned somewhere else in their lives, and hopefully explore!

Stay tuned for examples of my sketchbooks for this year as well as my lesson plans.  I am going to try to use the layout from the template and post each lesson for not only sharing, but for record keeping and reflection.  We will see...

Heres to an amazing year!!

Tuesday, April 30, 2013

How do we LOOK at art? - Critique in the elementary classroom - Part 1

This question is a good one, especially on critique days.  It is important that students know how to look at a piece of artwork, albeit their own, or someone else's.  Here is where the journey begins with some simple language to share with your students.  Emphasis on simple--stuff they can remember...er me too!  

While getting my master's degree, during my final class I needed what is called a "Transformative Event" or in my language, something that you feel very passionate about within your content area.  I happen to be one of a couple of art educators going through this program, so it was helpful to use them as a sounding board.  I felt it necessary to educate young people about how to look at art...along with the world around them.  This transfers to just about anything...can you say cross-curricular!  I suppose we could ask the question, "How do we LOOK at the world around us?"  Little long, but you get the point.  Hopefully, students will subconsciously use these tools---if we use it enough in the classroom.  

A beginning exercise would be to show a piece of art, on the smart board, or poster and pose these questions to the students.  Each bulleted point allows them to focus on a specific area of the artwork and to dissect each area allowing them to collect data.  The importance of this data collection is to help students create an opinion and understanding of the artwork deeper than the "I like it" or "I don't like it" surface opinion.  Try it, see what happens.  It is a nice mini-lesson that may allow you to help your students look deeper into not only their own artwork, but others, looking for a more authentic meaning and journey to understanding the artwork around them.    

Thursday, April 25, 2013

3rd Grade - Line, Shape & Color Triptych

In the beginning, there was line, shape and pattern...and zentangles!  Almost all of my students have done some form of zentangle, and for most of them it is enjoyable.  My 3rd grade curriculum charges us to cover line, shape and pattern in the first quarter, so we did, and instead of separating it into different projects, we combined them into this beautiful triptych of sorts for displaying.  This project took longer than I had intended, but the quality of work was astounding and therefore warranted the time the students were involved in the process of their creations.  Each square is a 6x6 square and they were glued on a black background for displaying.   

Square 1's instructions were to use different lines after the basic zentangle dots, borders and string were created.  They were asked to use different lines and only different lines.  Square 2's instructions included the same zentangle beginning and uses shapes as the designs.  Square 3 was the combination square of lines and shapes to create different patterns.  

Overall this project turned out incredible and students were surprised by their own work as well, they took their time and worked on their craftsmanship, while reviewing lines, shapes and patterns.  


Wednesday, April 24, 2013

1st Grade - Andy Warhol Soup Can's

I am sure that every art teacher has their favorite artist to study.   I do have many likes, but none hold the torch to my favorite, Mr. Andy Warhola.  So for the 4th and final quarter, I have decided to share him with many grades, partly because, hands down, I am obsessed, but because his artwork shows unity and variety perfectly!  For many grades, our curriculum leaves variety and unity, not to mention emphasis for the end of the year, so instead of dread these lovely, albeit sometimes difficult, concepts to teach, I choose to have fun and plus, talking about Andy and his crazy hair is always a fun classroom discussion!

When we start with the end in mind for our lessons, I have something like this imagined... (yes, our display will in fact be on a bulletin board, under less that fantastic lighting, however, I believe it will be very powerful!)

'Campbell's Soup Cans' by Andy Warhol, Museum of Modern Art, NY

I have my 1st graders twice a week for 30 minutes a pop, so my lessons are quick and effective.  Day 1 goes something like this.  Students walk in and sit down, we watch a couple clips from a movie on Andy Warhol...it is a cartoon and it explains Andy in his voice and with really funny puns...those are more for me.  I get a laugh, the students get a quick version of Andy in their terms, for the most part.  They are exposed to images of his artwork, a little history, and a cool story for them to associate with.  Then the real fun begins.  We do a step by step drawing of a cylinder.  Mind-blowing no, exciting for them, yes.  We add the can details such as, fancy "Campbells" lettering, the line (that looks like a smiley face) in the middle of the can, a circle for the symbol of flavor, the can texture lines at the top, the favor, (I let them choose from real flavors, no unicorn soup in this art offering!) and the word soup and fleur symbols (we used stars--much easier).  We started in pencil and then outlined in sharpie, the artroom's best friend.  Lovely sampling of Day 1.  


Day 2 looked and sounded something like this.  You have to paint the background yellow, but you can paint the soup can any colors you want.  In order to emphasis the concept of unity, I had them create a soup can that was similar, additionally, I had them paint the backgrounds yellow.  They had their choice on the rest of the colors to help them understand the concept of variety.  Not only was I super excited about this project because it was Andy Warhol, but the kids have enjoyed finding their artwork and celebrating their collaborative bulletin board together.  Here is the finished product.  I still have students that haven't finished, along with a small stack that won't fit on the wall.  I will fill up the rest of another bulletin board with the remaining.  I think Andy would approve.  


1st Grade - When Pigasso Met Mootise - Day 2

 
For the second day of Pigasso and Mootisse in the art room, the 1st graders learned about abstract art in a different way.  We watched the clip of Matisse clipping away at his colored paper and arranging free-form shapes in his artwork.  Students were challenged with something similar.  Supplies that were given:  black constuction paper 6x18 rectangle, multicolored squares 3.5x3.5 and scrap construction paper for cutting.  Instructions included choosing 4 background shapes, glueing them onto the black background.  Then students could choose what colors they wanted to cut shapes out of to glue onto their colored squares.  We talked about movement and space while cutting these out and arranging them as well as reviewed abstract art.  Pictures are coming shortly...while they are in process. 

1st Grade - When Pigasso Met Mootisse - Day 1

For the last couple years, I have struggled with 1st grade lessons.  I am not sure if it is the time limit that I have with them or the structure of mixed classes that has given me the challenge, nonetheless, I have struggled, until this year!  This year we have rocked in first grade, we have had so much fun this year and created so much amazing art this year, and I from what the 1st grade teachers have shared, I think they have learned quite a bit too.  (I am beaming about this!)  We are at the part of the year that I dread, the end, and I am wanting to keep our lessons very meaningful, but short and sweet, due to end of the year activities and such.  So this is a weeks worth of fun wrapped into a fun story! 


After we watched the story being read, we talked a little about abstract art.  We talked about it being something that doesn't look like anything in particular, mostly unfamiliar.  I drew an example on the board of an apple (that looks like an apple) then I drew an abstract apple (that has all of the apple parts, stem, leaf, but were in the wrong places on a different shape.)  I told them that this was an apple too.  We discussed that sometimes we need more information about a piece of artwork for us to learn about what it is, or what it is about.  This allows us to look further for meaning within artwork we do and see.

When we were done discussing, I gave students a 6x6 square of paper and allowed them to create something abstract using oil pastels.  Each one explained what they were drawing when I walked around and inquired.  They took these home and I asked them to show their artwork and explain it to those at home.

Here is a sampling of day 1's take home artwork.


Sunday, April 21, 2013

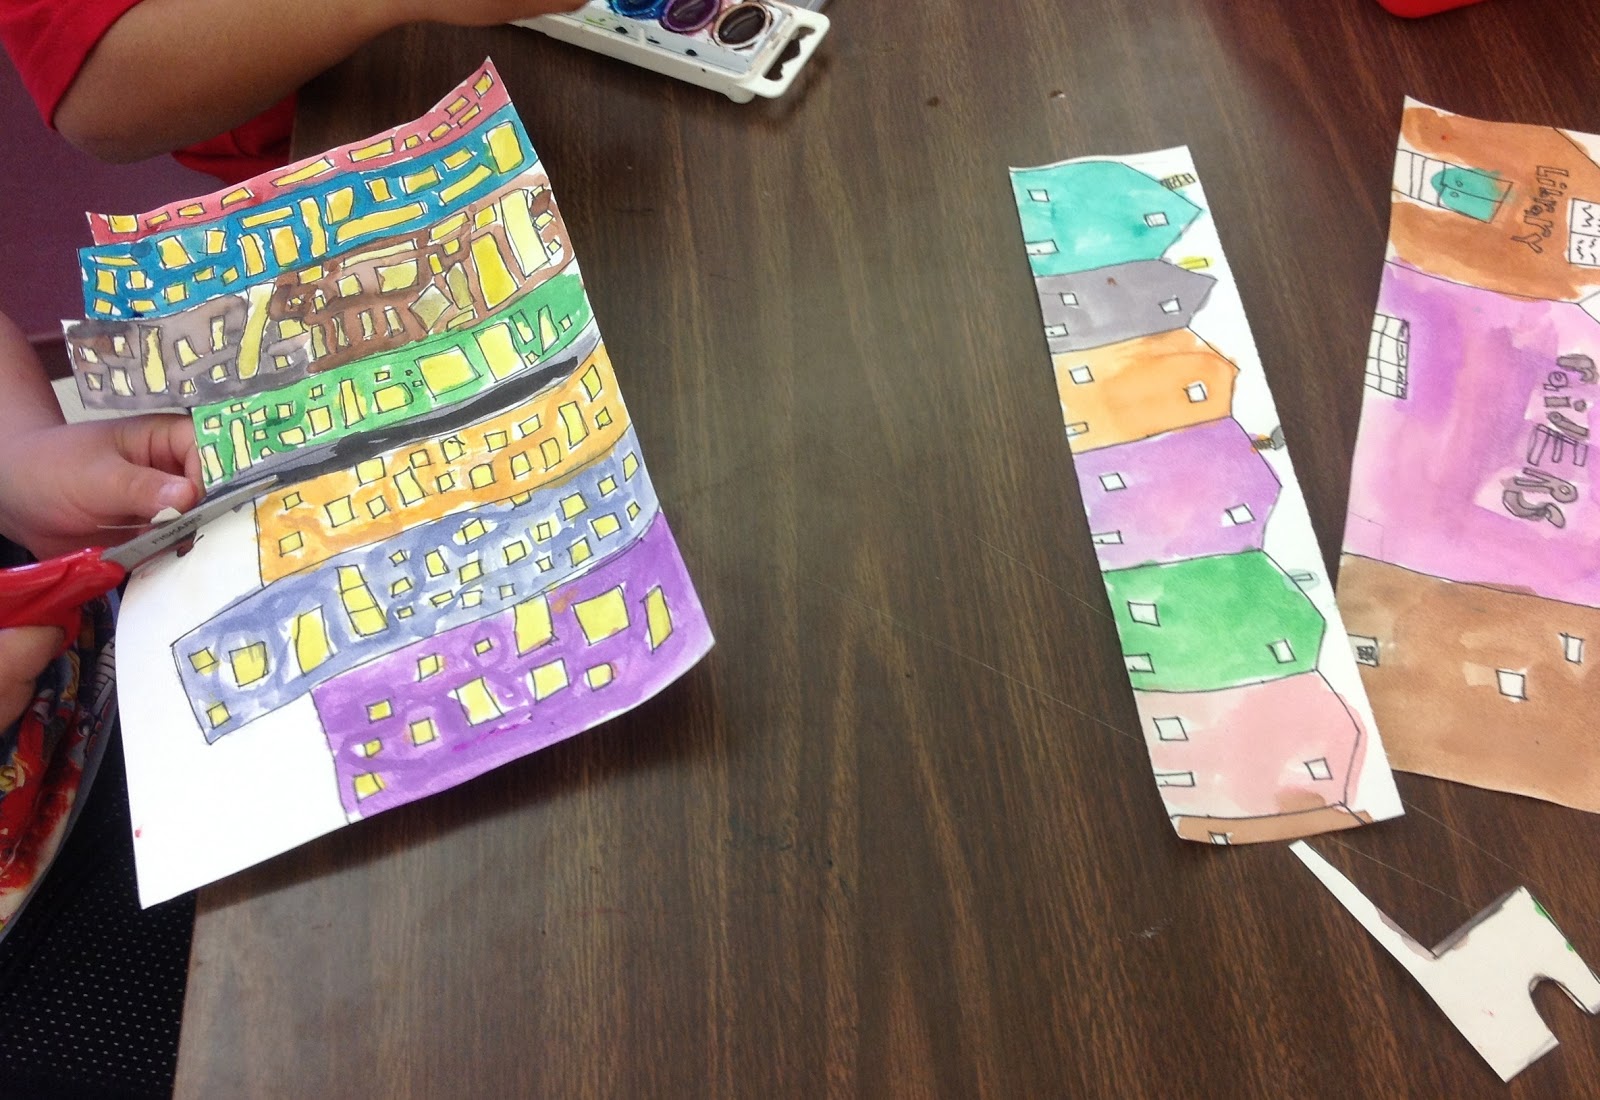
3rd Grade Cities - Space

I love architecture, so I would have to say that space is my absolute favorite concept to teach in the art room.  For 3rd grade we created cities that have space, albeit not much in between them, but they have some space separating them.  I started out the lesson reading the book Iggy Peck, Architect.  Sweet little book about a 2nd grader that builds all sorts of things and saves his class using his mad designing an building skills.

We then talk about what space is.  I try to keep it simple.  I explain that there is above us, below, on either side--basically all around us.  Then I say, but there is also space within us--like the art room.  We use the space in the art room, but there is space all around the art room as well.  I also touch on the career of an architect and what they do.

So step one on the project, I gave each student 3 sheets of paper, 12x3, 12x5.5 and 12x8.  Then I explain the types of buildings that need to be drawn on each size.  The small needs to have houses, the medium should have shops and small buildings and the large, skyscrapers.  They got pretty creative and added landmarks they have visited and landmarks from our town.  They drew with pencils and then outlines with thin Sharpies.  Afterwards, they watercolored.  Finally, they cut out the sky part to give a skyline to each size of buildings.  Lastly, they chose the background sky color (I gave them orange, black and blue to choose from) and they glued each down with little foam squares.  I just cut up a large foam piece into 1/2 x 1/2 inch squares.  After gluing everything on, there is space between the background and the skyscrapers, the boutiques and small buildings and the houses.

They did a fantastic job.


Saturday, April 20, 2013

6th Grade Landscape Pattern Zentangles

During the beginning of the year, pattern shows it self as a review item in our curriculum.  This year I have scaled my projects down a bit to find out if students take less time and produce better quality. This project measures 6x6 square (a very common size in my classroom).  Our time together in the classroom is an hour a week, therefore less surface area equates to using time wisely...I hope.  So for this project we talked a little bit about perspective and how things should look if they are closer and further away, we also talked about how the separation of space draws your eye to certain areas of your artwork.  Then came the "have to's."  Students had to have a sky and some sort of ground area that was divided into at least 5 areas.  I also explained to them that each area needed to be filled with a difficult 6th grade ability level pattern.  Additionally, I gave them a handout from a book I have on zentangles that outlined some new and difficult multiple step patterns.  Lastly, they used Sharpie, my favorite tool.  I think they enjoyed it as much as I enjoyed watching them take their time and create beautiful landscapes.

Kindergarten Texture

So as I am reading "Three Ninja Pigs" to my own children for the umpteenth time I had an epiphany.  To show the difference between real and visual texture to the little people of my grade levels, what if I  take something very familiar and add another layer.  Not only is the book amazing, the prose, the pictures, the message, but also a great learning tool for my classroom.  So we read the book.  The kids thought it was funny.  Then we decided what each pigs houses were made out of.  In the book, pig 1's house is bamboo (a modern take on the vintage, straw)  so we used spaghetti.  Pig 2's house was a modern wood -- we used popsicle sticks and pig 3's house was a sleek concrete, we used the old fashioned brick.  I found images of the brick and placed a bunch on colored paper, which they could cut out and glue on to their paper.  We did this first.  We talked about texture being "seeing texture" or "feeling texture"--they could see the bricks, but not feel them so it was only "seeing texture."  Then we added popsicle sticks for pig 2's house and visited about it being "feeling texture" and "seeing texture." Finally, we added dry spaghetti for pig 1's house and filled in the background.  The kids loved gluing all the "feeling and seeing texture" to their artwork and thought that the story was a great version.  I did too!  Check out the pics.


Kindergarten :  Real & Visual Texture